

Hesperian Health Guides
Evaluating a Child’s Needs for Aids and Procedures
HealthWiki > Disabled Village Children > Chapter 7: Paralysis > Evaluating a Child’s Needs for Aids and Procedures
Step 1: Start by learning what you can through talking with the child and family (see Child’s History). As you do this, watch the child move about. Observe carefully which parts of the body seem strong, and which seem weak. Look for any differences between one side of the body and the other, such as differences in the length or thickness of the legs. Are there any obvious deformities, or joints that do not seem to straighten all the way? If the child walks, what is unusual about the way she does it? Does she dip forward or to one side? Does she help support one leg with her hand? Is one hip lower than the other? Or one shoulder? Does she have a humpback, a swayback, or a sideways curve of the back?
These early observations will help you know what parts of the body you most need to check for strength and range of motion. Often, by watching a child you can begin to get an idea about what kind of aids or assistance may help. For example:
| Carmen appears to have severe paralysis affecting both legs and her right arm. Weakness in her trunk (main part of her body) appears to have caused an S-shaped curve in her spine. |  |
| She will probably always need a wheelchair or wheel board to move.
You may also want to make her a body brace, or help her in other ways to sit more upright and try to keep her spine from bending more. |
 |
| Pedro appears to have severe paralysis in his legs and hips. It looks as if his hips, knees, and feet cannot straighten due to contractures. Weak stomach muscles and severe hip contractures may be the cause of his swayback. |  |
| Because his arms are strong, Pedro will probably be able to walk with crutches and leg braces. First his contractures must be straightened. If the contractures cannot be straightened by gradual stretching, he may need surgery. |
strap to gradually straighten hips | casts to straighten knees and ankles |
 | ||
 |
Because of hip weakness, he may need long leg braces with a hip band. | |
| Manuel walks with the help of a stick. He appears to have paralysis mainly in his right leg and foot. Because of weak thigh muscles, he “locks” his knee backward in order to bear weight on it. This “back-kneeing” has become more and more extreme as the cords behind his knee have stretched. His foot is very unstable and flops to one side. His weaker leg looks somewhat shorter—and for walking is much shorter because of his bent-back knee and bent-over foot. |
 back-knee
floppy
foot |
| He might be able to walk without the stick if he uses a below-knee brace to stabilize his foot. But his back-knee would become worse and worse until he could not walk. So probably he should have a long-leg brace. The brace might allow his knee to bend backward just a little for stability — so that no knee lock is needed. |
 pad holds knee forward
firm ankle support
raised sole
|
| Afia leans forward and pushes her weak left thigh with her hand when she walks. Her left knee cannot quite straighten. Her weak leg looks a little shorter than the other. | Or she may need an above-knee brace with a strap to pull the knee back. | Or she may only need a below-knee brace that helps push her knee back. |
 |
Exercises to get her knee straighter or so it can bend very slightly backward may be all that is needed for Afia to walk without using her hand. |
 Pad pulls knee back
raised sole |
 Brace pushes knee back |
 |
The brace bends the foot down just a little, so that by bearing weight on toes (rather than heel) her knee is pushed back. |
To get a better idea about which of the three solutions may work best for Afia, you will need to do a careful physical examination, testing range of motion and muscle strength of her hip, knee, and ankle joints.
Step 2: This is the physical examination. It should usually include:
- Range-of-motion testing, especially where you think there might be contractures (see “Physical Examination,” and “Contractures”.)
- Muscle testing, especially of muscles that you think may be weak. Also test muscles that need to be strong to make up for weak ones (such as arm and shoulder strength for crutch use).
- Check for deformities: contractures; dislocations (hip, knee, foot, shoulder, elbow); difference in leg length; tilt of hips; and curve or abnormal shape of the back.
Step 3: After the physical exam, again observe how the child moves or walks. Try to relate her particular way of moving and walking with your physical findings (such as weakness of certain muscles, contractures, and leg length).
Step 4: Based on your observations and tests, try to figure out what kind of exercises, aids, or assistance might help the child most. Consider the advantages of different possibilities: benefit, cost, comfort, appearance, availability of materials, and whether the child is likely to use the aid you make. Ask the child and parents for their opinions and suggestions.
Step 5: Before making a final brace or aid to fit the child, if possible test to see how well it may work by using a temporary aid or old brace from another child. For example:
| If a child’s ankle bends over to the outside like this. . . |  |
. . . a lift on the outer side of the sole like this, may help to keep the foot straighter. |  |
| But before nailing and glueing in the lift, quickly make a trial one of cardboard or something else and fasten it temporarily to the sandal or shoe with tape or string. Then have the child walk. |
tape
|

Note: For a few children, a lift like this will help. For many it will not.
Ask the child what she thinks.
Step 6: After the child, her parents, and you have decided what kind of brace or aid might work best, take the necessary measurements and make the brace or aid. When making it, once again it is wise to put it together temporarily so that you can make adjustments before you rivet, glue, or nail it into its final form.
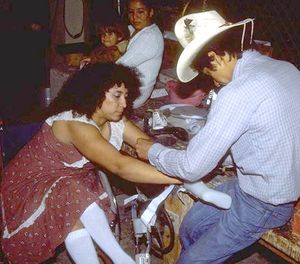 |
| Mari and Chelo making a child's brace |
Step 7: Have the child try the brace or aid for a few days to get used to it and to see how well it works. Ask the child and parents if it seems to help. Does it hurt? Are there any problems? How could it be improved? Is there something that might work better? Make what adjustments are necessary. But remember that no brace or aid is likely to meet the needs of a child perfectly. Do the best you can.
Here is a story of how workers in a small village rehabilitation program figured out what kind of aids a child needed. How many of the steps we have just discussed did they follow? Was each step important?
A BRACE FOR SAUL

pants
sister
One day a mother from a neighboring village arrived at the village center with her 6-year-old son, Saul. Mari and Chelo, 2 of the village rehabilitation workers, welcomed them warmly. Learning that Saul had polio as a baby, they asked him to walk, and then to run, while they watched carefully. Saul limped a lot and one leg looked thinner and shorter. With each step it bent back at the knee.
“He walks quite well, really,” said Mari. “But he has to ‘lock’ his knee back in order to put weight on it. That knee is going to keep stretching back and some day it will give out.”
“A long-leg brace would protect his knee,” suggested Chelo. “Oh, please, no!” said Saul’s mother. “A year ago we took Saul to the city and the doctors had a big metal brace made for him. It cost so much we are still in debt! Saul hated it! He would always take it off and hide it. We tried and tried to get him to use it, but he wouldn’t.”

“That’s not surprising,” said Mari. “Often a child who can walk without a brace will refuse to use one—even if he walks better with it. We could make him a long-leg brace out of plastic. It would be much lighter. What do you say, Saul?” Saul began to cry.
“Don’t worry, Saul. Maybe we can do something simpler,” said Mari. “But first let’s examine you, okay?” Saul nodded.
On muscle testing Saul, they found he could not straighten his knee at all. But he had fair strength for bending his knee back ...  That's as high as I can go.
|
... and his hip forward ...
I touched you! |

... and good strength for bending his hip back.

|
1, 2, 3, 4, 5!
“Okay,” said Saul. “Sounds like fun!” |
“With the hip and thigh strength he has, he should almost be able to stand on that leg without the knee bending back,” said Mari. “Saul, let’s see you try it like this. Pretend you’re a stork!” For a moment Saul could do it. “Good!” said Mari. “Every day stand like that and see how high you can count without letting your knee go back. Every day try to beat your old record! Okay?”
|

“The stork exercises may help,” said Chelo. “But I still think he needs a brace. At least at first.”
|
A long-leg brace might weaken the muscles Saul needs to strengthen.
|
"We must weigh the advantages against the disadvantages,” said Mari. “A long-leg brace would keep his knee straight. But it could weaken the muscles he needs to strengthen. Since the brace would keep his leg from bending back, he wouldn’t have to use his muscles to do it. |

“On the other hand, we might try a short-leg brace that holds his foot at almost a right angle. Then, to step flat he will have to keep his knee nearly straight. It could help him strengthen his behind-the-thigh muscles.”
“Let’s try it!” Everyone agreed, except Saul.
 short-leg
plastic brace |
Chelo brought someone’s old, lower-leg plastic brace and showed it to Saul. “See how it will fit right around your leg. It isn’t heavy at all. Lift it! And no metal joints to get in the way! What do you say? Do you want to try it?"
|
When the brace was made, they tested it. Saul said he liked it. At first, when he tried hard, he could walk without bending his knee back. But after a few days, his mother complained that often he would walk, or even stand, with his knee bent way back as before, and his toes in the air, like this.
| "WE THOUGHT IT WOULD WORK LIKE THIS..." |  |
"... BUT IN FACT IT WORKED LIKE THIS." |  |
“I have an idea,” said Chelo. “Why don’t we let the heel stick out behind the shoe. That way, when he steps, his weight will come well forward of the back of his heel. This should help bring his foot down and his knee forward.”
They tried it, and most of the time (especially when he was reminded) Saul walked without letting his knee bend back much.
| "THIS WORKED BETTER" | ||
| Heel extended backwards helps prevent back-kneeing. |  |
rounded front of sole to avoid pushing knee back at end of step |
| At home Saul’s mother encouraged him to do his stork exercises. As his muscles grew stronger, he began to walk without bending his knee far back — even in active play! |  |
