

Hesperian Health Guides
Make Water Safe to Drink
HealthWiki > A Community Guide to Environmental Health > Chapter 6: Protecting Community Water > Make Water Safe to Drink
It is better to protect and use a source of safe water, such as a spring or protected well, than to treat and use water from a contaminated source, such as a river or waterhole. But water from any source will need to be treated if it has been contaminated, if people refuse to drink it due to color or taste, or if it is carried and stored in the home. (Water from pipes, tanks, and wells will also need treatment before drinking if it has been contaminated.)
The methods you choose to treat water will depend on how much water you need, what it is contaminated with, how you will store it, and what resources are available. No matter how it is treated, it is best to either let the water settle and pour it into another container, or to filter the water before disinfecting it. This removes the sediment (particles of dirt). Removing sediment makes disinfection easier and more effective.
The methods shown here do not make water safe from toxic chemicals. Water that contains toxic chemicals is never safe for drinking, bathing, or washing clothes. It may lead to cancer, skin rashes, miscarriages, or other health problems.
To make water safe from germs, follow these 2 steps, filter and disinfect:
1. First, let the water settle for a few hours and pour it into a clean container, or filter it:
|
Cloth filter
…or…
|
 Charcoal filter
Sand
Charcoal
Coarse Sand
Filtered water
|

See other ways to settle and filter water.
2. Then, disinfect the water using 1 of these methods:
 |
 |
 |
 |
|||
| Boiling | …or… | Adding chlorine |
…or… | Solar disinfection | …or… | Adding lime or lemon juice |
Settling water
Settling water allows dirt, solids, germs, and worms that cause some illnesses to fall to the bottom of the container. Storing water for 5 to 6 days will reduce the number of germs in the water. But some germs, such as giardia, will not be killed by any length of storage. For this reason, use another method after letting water settle to make it safe, such as filtering, chlorinating, or solar disinfection.
3-pot method
The 3-pot method settles water so germs and solid matter fall to the bottom. This method is safer than settling water in 1 pot, but it does not make the water completely free of germs. The 3-pot method should always be followed by disinfection.


Morning, Day 1: Fill pot 1 with water. Cover the top and let it settle for 2 days.
Morning, Day 2: Fill pot 2 with water. Cover it and leave for 2 days. The dirt in pot 1 is beginning to settle.
Morning, Day 3: Pour the clear water from pot 1 into empty pot 3, making sure not to pour out the sediment at the bottom of pot 1. The water in pot 3 is now ready for disinfecting. The dirty water and sediment left in the bottom of pot 1 can be poured out. Wash pot 1 and refill it with water. Cover it and let it settle for 2 days. (It will be poured out and ready for disinfecting on Day 5.)
Morning, Day 4: Pour the clear water from pot 2 into pot 3 for disinfecting. Wash pot 2 and refill it with water.
Every few days, wash the clear water pot (pot 3) with boiling water. If you use a clean hose to siphon water from one pot to the next, the sediment will be less disturbed than if you pour the water.
Using plants
In many places, people use plants to make water safer to drink. Moringa seeds are used in East Africa. Moringa is called malunggay in the Philippines, horseradish tree or drumstick tree in India, and benzolive tree in Haiti and the Dominican Republic. To use moringa seeds:
 |
|
Filtering water
There are many ways to filter water to make it safer from germs. Some filters, like the ceramic filter below, require special equipment. Others need no special equipment and can easily filter small or large amounts of water before disinfecting.
Cloth Filters

In Bangladesh and India, a filter made of finely woven cloth is used to remove cholera germs from drinking water. Because the cholera germ often attaches to a tiny animal that lives in water, filtering out these animals also filters out most cholera germs. This method also filters out guinea worms.
You can make a cloth filter out of handkerchiefs, linen, or other fabric such as the cloth used to make saris. Old cloth works better than new cloth because worn fibers make the spaces in the weave smaller and better for filtering.
- Let water settle in a container so that solids sink to the bottom.
- Fold the cloth 4 times and stretch or tie it over the mouth of another container or water jar.
- Pour water slowly from the first container through the cloth into the second container or jar.
Always use the same side of the cloth, or germs may get into the water. After using the cloth, wash it and leave it in the sun to dry. This kills any germs that may be left in the cloth. In the rainy season, disinfect the cloth with bleach. Be sure to clean the container you use to store the filtered water in, at least every 2 to 3 weeks.
Ceramic Filters
A small water filter can be made from fired clay coated with colloidal silver (a substance that kills germs). With basic training, any potter can easily make these filters. (For more information, see Other Water and Sanitation Resources.)

How to make a charcoal filter
This filter is easy to make and removes most germs from small amounts of water.
Materials: 2 metal or plastic buckets, a hammer and 1 or 2 large nails, a bucket of coarse sand (not sea sand), a quarter bucket of wood charcoal
- Make holes in the bottom of 1 of the buckets. Wash the bucket. This is now the filter bucket.
- Clean the sand by rinsing it in water and draining until the water that drains off is clear.
- Crush charcoal into small pieces. Activated charcoal works best, but ordinary wood charcoal will also work. Never use charcoal briquettes! They are poison!
- Put a layer of washed sand 5 cm deep into the filter bucket and pour water over it. Water should run out through the holes. If no water runs out, make the holes bigger. If sand runs out, the holes are too large. If this happens, remove the sand, place a thin cloth over the holes, and replace the sand.
- Place a layer of crushed charcoal about 8 cm deep on top of the sand. Now fill the bucket with more sand, until the sand is 10 cm below the top of the bucket.
- Place 2 sticks on top of the second bucket and set the filter bucket on these sticks. Pour clean water through the filter bucket several times until the water comes out clear into the collecting bucket. Now the filter is ready for use.
- To use the filter, allow the water you collect to settle before pouring it through the filter. Drinking water collects in the clean, bottom bucket. To be safest, after filtering, disinfect the water.

Because the germs that are filtered out will grow on the charcoal, it is important to remove and clean the charcoal every few weeks if the filter is used daily, or any time the filter has been unused for a few days.
How to make a household slow sand filter
This is one of the safest, most effective, and cheapest ways to filter water for a household. This filter can treat enough water for a small family (at least 50 liters per day).
- Clean a watertight 200 liter container and disinfect it with bleaching powder. Make sure the container did not contain toxic materials.
- Drill a hole ¼ to ⅓ of the way down from the top of the container for the valve or tap. The hole should be sized for the fitting on the tap. (For example, if the tap has a 12 mm fitting, the hole should be 12 mm wide.)
- Fit the tap to the hole and fix it in place with hard-setting putty. If a brick container is used, the valve can be cemented within the wall.
- Prepare the flexible water collecting pipe. Drill or punch many small holes in the first 35 cm of the hosepipe, seal the end, and form it into a ring on the bottom of the container with the holes facing downward.
- Connect the top of the hosepipe (the end with no holes) to the tap. Seal the pipe fittings with hose clamps or wire.
- Place a layer of clean gravel 7 cm deep on the bottom of the barrel to cover the water-collecting pipe. Cover the gravel with fine cloth and fill the barrel with clean river sand to about 10 cm below the tap. Then cover the sand with a second fine cloth.
- Make a cover for the container, with a hole in it to pour water through. Place a flat rock or dish under the hole to prevent disturbing the sand when water is poured in.
- Flush the filter with water. Once the filter is cleaned, it is ready to use.
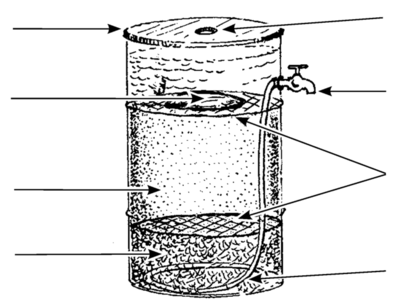
flexible pipe
To use and maintain a slow sand filter
After a few days of use, a layer of green scum (bacteria and algae) will grow on top of the sand. This helps to treat the water, so do not remove it. For this scum to work, the sand must always be covered with about 5 cm of water. (This is why the tap is placed above the sand layer.) Fill the filter daily and remove water only in small amounts. If the filter is drained completely it will not work well, and will need to be cleaned and refilled.
Allow solids to settle out of the water before pouring it into the filter. This will reduce the need to clean the filter because the water will be cleaner when it enters. Letting water flow like a waterfall as you pour it will add air into the water and make it taste better.
When the water flow from the tap slows down, clean the filter. Drain all the water and remove the green layer and about 1 cm of sand from the top. After many cleanings, when more than half of the sand has been removed, replace all the sand and gravel with new cleaned sand and gravel and start over. This may be necessary 1 or 2 times a year.
Arsenic filter
To filter out arsenic from water, add a container filled with iron nails to the top of a slow sand filter. Use 5 kg of the smallest sized iron nails. Do not use "galvanized" nails because the nails must be able to rust for the filter to work. Arsenic binds to the rust on the iron nails and is removed from the drinking water. If possible, test the water after it has been filtered to be sure that the filter works in your area. (For more information, see Other Water and Sanitation Resources.)
Disinfecting water
Disinfecting water kills germs and worms, making water safe to drink. The best methods are boiling, solar disinfection, or using chlorine.
Boiling water

|
| Boiling water for 1 minute makes it safe from germs. |
Bring water to a rapid, rolling boil. Once it starts boiling, let it boil for 1 full minute before taking the pot off to cool. In high mountain areas, water needs to boil for 3 minutes to kill germs because water boils at a lower temperature high in the mountains.
Boiling changes the taste of the water. After boiled water cools, pour it into a bottle and shake it strongly. The shaking will add air to the water and improve the taste.
Where firewood is scarce, boiling water can be difficult. Planning to boil water after food is prepared but before the fire dies is one way to reduce your use of wood.
How to disinfect water with sunlight
Solar disinfection is an effective way to disinfect water with only sunlight and a bottle. Filtering or settling the water first will make it clearer so it will disinfect more quickly. Solar disinfection works best in countries close to the equator, because the sun is strongest there. The farther north or south you are, the more time is needed for disinfection to work. (For more information about solar disinfection, see Other Water and Sanitation Resources.)

- Clean a clear plastic or glass bottle, or a plastic bag. Bottles made of PET plastic work best.
- Fill the bottle half full, then shake it for 20 seconds. This will add air bubbles to the water. Then fill the bottle or bag to the top. The air bubbles will help to disinfect the water faster.
- Place the bottle where there is no shade and where people and animals will not disturb it, such as the roof of a house. Leave the bottle for at least 6 hours in full sun, or for 2 days if the weather is cloudy.
- Drink directly from the bottle. This will prevent contamination from hands or other vessels.
Solar disinfection can be done faster and more completely by putting the bottle in a solar cooker.

Lime or lemon juice
Add the juice of a lime or lemon to 1 liter of drinking water and let it sit for 30 minutes. This will kill most cholera and some other germs as well. This does not make water completely safe, but is better than no treatment in areas where cholera is a threat. Adding lime or lemon juice to water before using solar disinfection or the 3-pot method will make the water safer.
Chlorine
Chlorine is cheap and easy to use to kill most germs in drinking water. But if too little chlorine is used, it will not kill germs. If too much is used, the water will taste bad. Chlorine is best used in community water systems, because it can be difficult for a single household to do it well all the time. To use chlorine to disinfect household water, follow the instructions below.
Large amounts of chlorine are harmful to people and the environment, but the amounts used to disinfect home and community water are generally safe. It is safer to disinfect water with chlorine than to risk the health problems caused by germs.
How much chlorine to use?
The amount of chlorine needed to disinfect water depends on how contaminated the water is (how many and what kinds of germs it contains). The more germs there are in the water, the more chlorine you need to get rid of them. It is important to add enough chlorine so that some is left in the water after the germs are killed. The chlorine that is left is called free chlorine. This will kill any new germs that get into the water. If the water has free chlorine in it, it will smell and taste just slightly of chlorine. This tells you it is safe to drink. If it has too much, the smell and taste will be strong and unpleasant.
To use the right amount of chlorine, you need to know how strong your chlorine solution is. Chlorine comes in different forms -- gas, bleaching powder, high-test hypochlorite (HTH), and household liquid bleach. But household bleach is the form of chlorine that is easiest to find.
Household bleach may have different amounts of chlorine. Most common are 3.5% and 5%. This book shows how to disinfect water with 5% chlorine household bleach. Read the label to see what percent of chlorine is in your bleach. If it is less than 5%, you will need to add more bleach to the water.
If there is a lot of solid matter in the water, the chlorine will not work as well, so filter the water or let the water settle. Pour the clear water off into a clean container and then add the amount of bleach shown in the chart below. If you cannot filter the water or the water is cloudy, use twice as much bleach as what is shown below. Wait at least 30 minutes before drinking. If the water smells and tastes just slightly of chlorine, it is safe to drink.
| Water | 5% Chlorine Bleach | ||
| For 1 liter or 1 quart | 
|
2 drops | |
| For 1 gallon or 4 liters |  |

|
8 drops |
| For 5 gallons or 20 liters |  |
½ teaspoon | |
| For a 200 liter barrel |  |

|
5 teaspoons |