Hesperian Health Guides
Ways to Make Toilet Training Easier
HealthWiki > Disabled Village Children > Chapter 38: Toilet Training > Ways to Make Toilet Training Easier
Contents
1. Start when the child is ready
Just as training should not be delayed, it also should not be started too early. If a child’s body is not yet able to control her bladder and bowel, trying to train her can lead to failure and frustration—both for the child and her parents. Children are usually ready by age 2 or 2½. But in some children, training may need to be delayed to age 3 or 4, or sometimes later.
Most children learn to keep clean a long time before they learn to stay dry. However, because a child pees much more often than she shits, if training aims at “staying dry,” “staying clean” usually follows.
There are 3 simple tests to check if your child is ready for toilet training. These are: bladder control, readiness to cooperate, and physical readiness. (These tests and many of these suggestions on toilet training are adapted from Toilet Training in Less Than a Day by Azrin and Foxx.)
 |
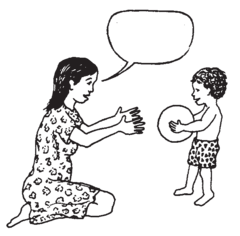
 Now bring me the ball. |
- Bladder control. Does your child pee a lot at one time and not dribble every few minutes? Does he often stay dry for hours? Does he seem to know when he is about to pee? (The look on his face, holding himself between the legs, etc.) If the child does these 3 things (or at least the first 2) he probably has enough bladder control and awareness of peeing to make training possible.
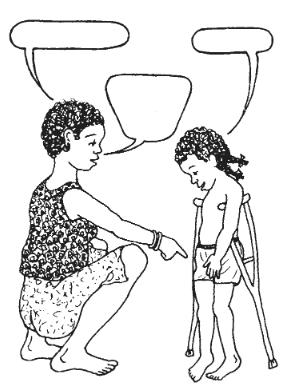
- Readiness to cooperate. To test whether the child has enough understanding and cooperation, ask her to do a few simple things: lie down, sit up, point to parts of her body, put a toy in a box, hand you an object, and imitate an action like hand clapping. If she does all these things willingly, she is probably mentally ready for toilet training.
- Physical readiness. Can the child pick up small objects easily? Can she walk or move herself fairly well? Can she squat, or sit on a stool, and keep her balance? If so, she is probably physically able to do her toilet by herself. If not, she can probably still be trained but may need physical assistance.
Most children more than 2 years old can pass these 3 tests. If not, it is usually better to wait before trying toilet training, or to help the child become more ready.
SPECIFIC CHALLENGES
If the child still does not have enough bladder control or awareness, it is best to wait until she is older. For example, some children with cerebral palsy are slow in developing bladder control.
If the child does not hear or understand simple language, or has cognitive delay, more of the training needs to be done by showing and less with words. Special gestures or signs need to be worked out for “wet,” “dry,” “dirty,” “clean,” and “pot” or “latrine.” Instead of teaching by using a doll, it is more helpful to have another child demonstrate toilet use.
If the child is stubborn, refuses to cooperate when asked to do simple things, or often cries and screams whenever he does not get what he wants, toilet training will be more difficult. Stubbornness and refusal to do what they are told are common in many children with disabilities. Before trying to toilet train such children, it is wise to work first on improving their attitude and behavior. This is discussed in Chapter 40.
If a child’s physical disability makes it difficult for her to get to the toilet place, to lower her pants, to squat or sit, or to clean her butt, various aids or ways must be looked for to help her become as independent as possible. These will be discussed on the next pages.2. Put the child on the pot at the times when she is most likely to use it

Before beginning toilet training, for several days notice at what time of the day the child shits and pees. Usually there will be certain times when she usually does so—for example, soon after the first meal of the day.
Begin to put her on the pot or latrine at these times, encouraging her to make “poo” or “pee” (or whatever she calls it).
Leave her on the pot until she goes— or for no more than 10 minutes. If the child goes, clap your hands, kiss her, show her what she has done, and let her know how pleased you are.
If she does not go, just ignore it. Do not scold or make her feel bad, or she may begin to fear or dislike the pot, and refuse to use it.
3. Reward and praise success

In toilet training—as in any form of education—it works better to reward success than to punish failure. When the child shits or pees where she should, give her praise, hugs, kisses and other signs of approval. However, make sure that the child knows you are pleased with her, not because she shits and pees, but because she is staying dry or clean. When training, check the child often to see if she is dry or clean. When she is, praise her. Also, teach her to check herself.
When the child has an accident and wets or dirties herself do not punish or scold her. It is better to quietly clean up the mess or change her. At most, say something friendly (but not approving) like, “Too bad!—Better luck next time!”

4. Guide the child’s movements with your hands
When the child has difficulty carrying out a physical task—for example, lowering his pants—do not do it for him (if it is something he can learn to do for himself). And do not tell him his mistakes or how to correct them. Instead, gently guide his hands with yours so that he learns how to do it himself.
5. Use models, examples, and demonstrations

Setting an example is one of the best ways of teaching—especially if the example is set by persons the child loves, admires, and tries to copy. Even before children are old enough to be toilet trained, help prepare them by letting them watch the older children use the pot or latrine. Tell them that when they are big enough they will be able to do it that way too.
Using a doll that wets is another good way to introduce toilet training. Dolls that ‘wet’ can be bought, or you can make one out of,
| a gourd | or a baby bottle inside a homemade rag doll | |
 open mouth (put water in here)
plug (pull to pee)
plug (pull to poop) |
 large hole in nipple of bottle
When lying down, no pee |
 When sitting up, doll pees |
Show the child how the doll pees in the pot. Or better, ask your child to help you toilet train the doll. Be sure to include each step that will be needed for the child to become as self-reliant as possible. For example:
| First have the child show the doll how to get to the latrine or pot — and then help the doll lower his pants. | Next have the child teach the doll how to get onto the pot, and sit there until he pees. Try to make the situation as nearly like that of the child as you can—using the same pot in the same place that he will use it. | |
 |
 |
Turn it into a game, but keep the focus always on toilet training. |

You're dry! Good boy! |
After the doll has finished peeing, have the child pull up the doll’s pants. Ask him to feel the doll’s pants and check whether they are dry. If so, have him praise the doll. | |
To repeatedly see real persons (not just dolls) enjoy and be rewarded for using the pot or toilet is especially important for a child with cognitive delay or who has language difficulty.
6. Adapt toileting to the special needs of the child
Many children with disabilities can be helped to become independent in their toileting if aids or adaptations are made. Different children will require different adaptations. However, the following are often helpful:
- If the child has trouble pulling down pants or panties—use loose fitting clothing with elastic or Velcro waist band.
- Use short “training pants” made of towel-like material that will soak up urine.
- For a child with cerebral palsy or spina bifida, it may be easier lying down—you might provide a clean mat.
- If people by custom squat to shit, and the child has trouble, a simple hand support can help.
- Latrines can also be adapted.
- A simple pot or “pottie” is one of the best aids for toilet training of young children. It can be adapted in various ways for children with disabilities.
| Correct position of hands, for lowering pants |
for raising pants | ||||
| Hook thumbs inside pants and push down. |  |
Put hand inside pants to pull over butt. |  |
For training, pin shirt up out of the way — or do not wear one. | |


 |
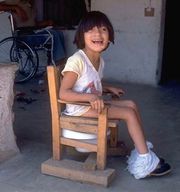
Some children, like this girl with cerebral palsy, need to sit. This potty seat was adapted from a child’s wood chair. |
 |
 |
 |
hand rail that can lift up | arm or shoulder supports close to the toilet toilet seat and wheelchair seat on same level |
 |
high hand rail to make moving from wheelchair to toilet easier |
| 2-seater latrine with child-sized hole and step |
Make the outhouse (latrine) and its door big enough so that a wheelchair can fit inside. Position the door so that the wheelchair can enter right beside the latrine without having to turn around.
Be sure the path to the latrine is level and easy to get to from the house.
| simple pot | more complex pots sold in some countries | “Baby Relax Toilette” with removable pot — gives good back and side support. | ||
 |
 |
These give good back support. |  |
 |
| For the child with cerebral palsy, the pot can be placed between mother’s knees. This provides good back support. Mother holds his shoulders forward, his hips bent and his knees separated. | Later it may be possible to put the child on a corner seat like this— which also holds arms and shoulders forward and helps keep hips bent. | ||
 |
 |
2 posts may be needed to keep knees apart bucket | |
| A cardboard box can also make a good sitting frame. | Use your imagination and whatever materials you can get to make it easier for your child to do it by herself. | ||
 |
 |
 |
 |
 shelf for pot |
 |
A cushion can be made to fit over the toilet seat for ordinary sitting. |  |
| Put a shelf for the pot. | |||
| Or leave the space under the seat open, so that the whole chair can be rolled over a toilet. |
| For the child who cannot sit up, you might make a wedge-shaped toilet box like this. |  | ||
| An old plastic bucket can be cut at the same angle as the bedpan so that it fits snugly under the hole. |  |
It works as a “bedpan,” or as a “floor pan” for the child who can roll or scoot but cannot sit or lift himself without help. This way the child can learn to take care of his own toilet. | |
 | |||
| For the child who has spasticity or difficulty with balance, you can make a seat like this. The bar can be put in after the child has been seated. |  |
The seat can be made to fit over a bucket, over a floor-hole latrine, or over a standard toilet. | |
| Tire potty seat — soft, safe, washable (ideas from India — UPKARAN manual). | ||||
| Tire can be used alone, | or over a “hole-in-the-floor” toilet. | or on a wood or metal frame over a toilet seat. |  | |
 |
 |
To keep urine from getting inside the tire, you can wrap long strips of inner tube tightly around the tire. | ||
| Cane or rattan toilet seat with climb up bars | Enclosed wood or plywood toilet | |||
| Removable front bar can be added if needed. |  |
 |
 removable back to wash baby’s butt afterwards
removable seat
Or seat can be placed over a hole-in-the-floor toilet.
removable potty holder for easy emptying |
|

REMEMBER: As children with disabilities grow, they will feel the same need of privacy as any child would for toileting and other personal acts. Help them to obtain the privacy they need.


