

Hesperian Health Guides
Plywood Frame Wheelchair
HealthWiki > Disabled Village Children > Chapter 66: Designs for 6 Basic Wheelchairs > Plywood Frame Wheelchair
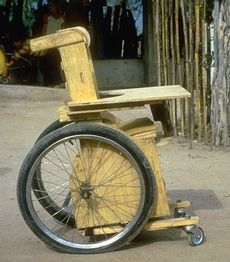
This can be easily built by someone with basic carpentry and welding skills. Positioning aids (head rest, hip pads, etc.) can be easily added. The chair can be designed to meet a child’s particular needs. For example, if the child sits well without extra support, the tops of the side pieces can be removed to allow more freedom of movement.
A plywood frame is a low-cost alternative to metal. However, if not made well, or if left out in the rain, the chair may weaken and the plywood can split. As with any wheelchair, it must be protected from misuse, periodically examined for weaknesses, and promptly repaired.
For active children the wheelchair can be strengthened by reinforcing all joints and by adding strong hubs and axles.

- Review drawings of chair and adaptive equipment.
- Cut out the two side pieces to the same shape; sand with sandpaper.
- Cut out back support, seat, and bottom piece of chair; sand with sandpaper.
- Screw or nail seat and bottom piece to back piece.
- Screw or nail side pieces to seat, bottom, and back.
- Check that all pieces are lined up straight. Then add glue and more screws or nails for strength.
- Cut out footrest and guide brackets for footrest.
- Screw or nail guide brackets to side pieces under seat.
- Bolt front casters to chair and assemble rear axle tube.
- Drill holes in side pieces for axle tube; mount tube and rear wheel.
- Let glue dry 1 to 2 days; check for strength of all wood joints.


(¼" to ½")

A plywood wheelchair with many adaptations
This wheelchair has a variety of additions sometimes needed for a small child who has difficulty body control, head control, and urine or bowel control. The head support and armrests fit into wooden holders and can be easily removed. A lap table can be easily added. Holes can be cut out for chest and hip straps for extra support.
SIDE VIEW

BACK VIEW

head positioner
 Wedge adjusts angle of head piece.
Important: Pad it well.
Bottom slides into slot on rear of chair. |
swing-up armrests
 brackets to hold armrests |
padded hip and shoulder positioners
 Tabs fit into slots in the wheelchair back and seat.
 INSIDE |
potty bowl holder with leg separator
 Pull out to empty potty.
potty bowl
Tree branch holds stiff legs apart. |
lap table
 Armrest brackets secure table to the sides of chair here.
plywood (¼")
The lap table should be cut to fit closely around the wheelchair sides. The same wooden brackets for the armrests keep this table in place. If the table wobbles, you can use small slats to strengthen the table. If the knee separator is made a bit higher, the table can rest on top of it and prevent any dips. |
SPRINGS FOR ALL 4 WHEELS
This plywood wheelchair has a springy ride. Old inner tube rubber strips connect the rear wheel axle to the wood strips holding the front caster wheels. These wooden strips should be strong enough to withstand the springy motion of the front casters.
Cut-away slots allow the rear axle to move up and down freely. Other cut-away slots in the bottom of the wheelchair allow for the inner tube strips to be wrapped around the wooden caster strips. The tighter the inner tube strips are wrapped, the less bouncy the ride becomes.
 Strips of inner tube connect rear axle to front-caster arms.
A long hole here allows back axle to spring up and down.
2 loose-fitting bolts keep caster arms from moving sideways.
Wood strip separates caster arm from the bottom. |
 Rubber or wooden caster wheel bolts to wooden arm.
inner tube strips
Notches keep rubber strips from slipping.
Loose-fitting bolt acts as pivot. |