

Hesperian Health Guides
Plastic Braces
Contents
Below the knee
For most children who need a below-knee brace, plastic braces molded to fit the leg and foot of the individual child have many advantages:

- They are lightweight and often more comfortable than
- They fit the child comfortably and exactly (if made well).
- They can be worn with ordinary shoes or sandals, which can be easily changed when they get worn out or wet. Shoes can be changed for school and for work.
- They are water resistant and easy to clean.
- They are less noticeable than metal braces. If desired, socks can be worn over them to hide them.
- Children usually prefer them and are more likely to keep wearing them.
Although a little more equipment and skill are needed to make plastic braces, once a village worker has learned the basic technique, they can be made as quickly and easily as a simple metal brace with a clog.
A disadvantage to plastic braces is that usually after a year or two the plastic “gets tired” and breaks. However, growing children need larger braces fairly often. It is wise to keep the plaster mold of each child’s brace so that a new brace can be easily made if needed.

Keep the mold of the child’s foot—or have the family keep it.
The biggest expense in making plastic braces is the plaster bandage used for casting a mold of the leg. The cost can be reduced a lot by making your own plaster bandage material.
Plastic braces can feel uncomfortable in hot weather and can lead to skin irritation and fungus infections if care is not taken. They can be made cooler by drilling “breathing holes” in them. Or cut out a hole in the back.
CAUTION! Do not put breathing holes in the lower part of the brace which has to be the strongest. |
 |
Sometimes if you cut a hole out behind the heel, the brace rubs less and is more comfortable. |
To prevent skin irritation, it is important to bathe daily. It also helps to wear cotton (not nylon) stockings under the brace and to use clean stockings every day.
 |
| This design of plastic brace supports the knee from the front and pushes it back (see "How to Control Up and Down Movement of Foot" and "Different plastic brace models for different needs"). |
How to make plastic braces
Here we describe 2 methods for making molded plastic braces:
The first method uses old plastic buckets or containers, and needs less equipment. Unfortunately, these braces tend to break easily when used for walking. However, they make excellent, low-cost night braces (to wear while sleeping).
The second method uses sheets of polypropylene plastic. Additional equipment (such as a vacuum sweeper) is needed, and it is a little more expensive. However, the result is a high-quality brace that can last for months or sometimes years.
Method 1: Plastic bucket braces
Equipment and materials needed:
|
 | ||
|
 | ||
|
 | ||
|
|||
|
|||
|
|||
|
|||
|
 | ||
|
 | ||
|
|||
|
 | ||
|
|||
|
 | ||
|
 | ||
|
|||
|
|||
|
 | ||
|
|||
|
hand or electric | ||
|
|||
Making the plastic-bucket brace consists of 3 main steps:
A. Making a hollow plaster cast of the child’s leg
B. Making a solid plaster mold of the leg
C. Heat-molding the plastic-bucket brace
A. Making the hollow cast
| 1. Tie a knot in the end of a soft rope. | 2. Put the rope on top of the leg with the knot between the toes. |
 | |
| 3. Put the stocking tightly on the foot with the rope inside (or wrap it with a thin cloth). Avoid wrinkles. | 4. Wet a plaster bandage and squeeze out the extra water. |
 Make sure the rope stays very straight. |
 |
| 5. Wrap on a thin cast (about 3 layers) while someone else holds the foot in a good position. Be sure the heel is covered with several layers. | 6. While the plaster is still wet, smooth it gently with moist hands, and press the cast gently into all the hollows of the foot. |
 |
 |
| 7. Before the plaster becomes firm, place the foot in exactly the position that you want the brace to hold it in. Sometimes it works well to hold the foot in your hands. But often it works best to have the child step firmly on the floor, or on a padded board. |  |
| Be sure to position the leg straight up, from side view and front view. | |
| 8. Draw some lines over the front of the cast. | 9. When the cast is almost firm but still damp (usually in 5 to 10 minutes), carefully cut through the plaster over the rope. Take care not to cut the child. |
 | |
 | |
| 10. Then gently remove the cast without changing its shape. | 11. Quickly (before it is fully hard) close the cast, line up the lines you drew, and tie it shut with cloth or string. |
 |
|
| 12. Tie a cloth tightly over the opening of the toes. |  |
B. Making the solid plaster mold
| 1. Put a bent piece of rod into the hollow cast | 2. Hold the cast in a standing position— perhaps in a box of sand. |
 |
 |
| 3. Mix the plaster: Put water in a container, enough to fill the cast. | While stirring, sprinkle dry plaster into the water Keep adding until the mix is just thick enough that wrinkles stay a moment on the surface. |
 | |
 | |
| 4. Quickly pour the mix into the cast. Jiggle the rod and tap the cast to be sure the mix fills all spaces. | 5. Hold the rod in the middle until the plaster is firm. |
 | |
 | |
| 6. After plaster hardens fully (about one hour) remove the solid mold. | 7. Being careful not to change the shape or size of the mold, use fresh plaster to fill in any holes or pits that are not caused by the shape of the foot. Add a little fresh plaster over bony places (so final brace will not rub).
 |
 | |
| 8. Smooth the surface (with a file, piece of wire screen, or piece of broken glass). Do not reduce any of the bumps caused by the bones. |  |
C. Heat-molding the plastic-bucket brace
| 1. Mark on the child’s leg the shape of the brace. |  |
2. Take measurements as shown for the width and length of the brace. |  |
| 3. Draw an outline on paper, according to the measurements and cut out the pattern. | 4. Mark the pattern on the plastic. | ||
 | |||
 | |||
| 5. Cut out the pattern with a saw or strong scissors. | 6. Make V-shaped cuts here to help bend the hot plastic around heel. | ||
 |
|||
| 7. Heat the oven to at least 450° F (230° C). If you cannot measure or control heat, put a small piece of plastic into the oven and heat it until the plastic becomes soft and gooey. | 8. Heat the plaster leg cast in the hot oven for 15 to 20 minutes. | ||
 | |||
 | |||
| 9. Put the hot mold on the rack. | 10. Lightly sprinkle dry plaster or talc on a metal sheet or tray. | ||
 |
 | ||
| 11. Put the plastic form on tray and put the tray into the hot oven. | 12. Leave it in oven only until plastic becomes somewhat flexible. | ||
 |
|||
| 13. Take hot plastic out of oven with gloves. Bend it over the hot mold. | 14. With strips of rubber, wrap plastic tightly to force it against the mold. | ||
 |
 | ||
| 15. And put it back into oven until plastic gets softer. (Take care not to overheat the plastic, because the plastic used for many buckets and containers tends to wrinkle like bacon when it gets too hot.) |
16. Remove from hot oven and press forcefully (with gloves) to fuse overlapped plastic at heels. | ||
 |
 | ||
| 17. Also press in any hollows around bones and on bottom of foot. Keep pressing until plastic begins to cool and stiffen. | 18. While brace is cooling, heal soldering iron. Heat to moderate heat — not red hot. | ||
 |
 | ||
| 19. Unwrap cloth from brace while still warm and use soldering iron to smooth and weld heel joint. | 20. When cool, trim and smooth the edges of the brace. | ||
 | |||
 |
|||
| 21. Glue or rivet a strap near the top of the brace. | For easier fastening, use Velcro straps. | ||
| For night splints, add 1 or 2 more straps at the ankle and foot. |
 pad well |
 | |
| For day use, or use with sandals or shoes, only the upper strap is needed. |  | ||
Note: Braces made from plastic buckets or containers tend to break fairly easily if a larger child uses them for walking. It is better to use polypropylene plastic (see below). |
|||
Method 2: Polypropylene braces
Polypropylene is a plastic available in large sheets from orthopedic supply stores and some plastic factories. For most braces, sheets 30 cm. by 60 cm. (1 foot by 2 feet) are large enough. Thickness should be 3 mm. (⅛ inch) for thinner, more flexible braces and 4 mm. to 5 mm. (3/16 inch) for stronger, less flexible braces.
This method is the one used by professional brace makers. Here we simplify it as much as possible. Equipment and materials needed are mostly the same as in Method 1. However, high-quality braces can be made more easily with a few extra pieces of equipment (they are not absolutely necessary). This extra equipment includes:
SPECIAL OVEN
SIMPLE SHEET-METAL BOX OVEN (riveted or soldered together)

If you can get it, rivet a piece of Teflon cloth over the metal sheet. This will help keep the hot plastic from sticking to the metal. Or you can use a Teflon spray.

COMPLEX GAS OR ELECTRIC OVENS
(designs from Huckstep’s Poliomyelitis.)


Some brace makers in Pakistan use no oven, but simply hold the plastic sheet over a “chula” (earth pot) of hot coals.
Vacuum sweeper (if electricity is available) or other form of suction. (The suction pulls the hot plastic tightly against the cast until it cools. However, this is not absolutely necessary.)

- metal pipe
Tape it to the end of the vacuum sweeper hose.
The pipe should be a little bigger than the rod used in the leg cast. By bending the rod slightly, it will fit very tightly into the pipe.

Figure out some way to clamp or bolt the pipe firmly to a strong bench or table.

- electric cast-cutter
| These are very expensive but a great help if you are making a lot of plastic braces. If you do not have a cast-cutter you may have to use a hammer and chisel to cut the plastic. You can heat the chisel so that it will melt the plastic. |  |
 |
Making the polypropylene (or polyethylene) brace
Steps A and B are the same as described for Method 1.
Step C. Heat-molding the plastic brace
| 1. Put the rod of the plaster mold into the vacuum pipe. Be sure it is very tight. (If not, take it out and bend the rod a bit more.) | 2. Stretch stockinette or stocking tightly over the cast and tape it to the pipe. | ||
 |
 | ||
| 3. Sprinkle dry plaster powder or talc over the entire foot and smooth it with your fingers. | 4. Preheat the oven and sprinkle plaster powder or talc evenly over the hot metal sheet. | ||
 |
 |
| 5. Cut a piece of polypropylene plastic large enough to stretch around the entire foot, and put it into the oven to heat. | 6. As the plastic gets hot enough to mold, it will turn clear so you can easily see through it. It often gets clear in the middle first. | ||
 |
 |
||
| 7. To move the hot plastic, 2 persons must wear thick gloves. Sprinkle dry plaster powder, lime, or talc on them. | 8. As the plastic is getting hot, turn on the suction (vacuum cleaner) and listen for a hissing sound where the pipe joins the cast. (This means the suction is working.) | ||
 | |||
 |
|||
| 9. When the plastic is hot enough (clear and limp), remove the oven lid, lift the hot plastic by its 4 corners, and quickly stretch it over the whole cast. |  | ||
10. Quickly pinch the edges of the plastic together along the bottom side of the leg and around the pipe. Squeeze together all edges to form a seal. You must work quickly to complete the seal before the plastic gets too cool. | |||
| As soon as the seal is complete, the suction should pull the hot plastic close against the cast. But if necessary, help by pushing it into the hollows. If no suction equipment is available, you can heat-mold the plastic by stretching it over the cast and pushing in the hollows until it cools. With practice, this gives almost as good results, and you only need about half as much plastic. |
|||
| 11. While the plastic is still hot and soft, cut off the extra with a sharp knife or strong scissors. | 12. After it cools, draw the form of the brace on the plastic, | ||
 |
 |
||
| 13. and cut it out either with a cast cutter, | or a hammer and chisel, or a red hot soldering iron, or however you can. | ||
 |
 | ||
| Finish the brace in the way described under Method 1 (steps 20 and 21). | |||
Making sure plastic braces fit well and are comfortable
| The most common problem with plastic braces is that they press on bony bumps. To avoid this, | ||
 |
put small pads over bony bumps before casting foot. Or, put the pads on the mold, and add a little fresh plaster to the bony bumps before molding the plastic. |  |
When the child wears the plastic brace, if it presses too much on bony places, or elsewhere,
| heat a small area over the spot where the bone presses, and with a smooth, rounded stick push the hollow deeper. (Use a heat gun if you have one.) |  | |||
| Soft padding inside the brace can make it more comfortable. Places that may need to be padded are: |
 over bony places or points of pressure
edges
upper part |
For padding you can use a product called “moleskin,” or a special foam plastic material available from orthopedic supply stores. Or you can glue in pieces of cotton blanket or car inner tube (but make sure the child wears cotton stockings to avoid skin problems). | ||
| The sole of the brace can end at the ends of the toes (or slightly beyond to allow for growth). | Or the sole can end at the base of the toes. |
 |
 |
| The side of the brace at the foot can extend to the toes if necessary for support. | For better comfort and shoe fit, the side can dip down around the base of the big toe. |
| AVOID brace edges that stop at middle of toes. | AVOID brace edges that pass across the middle of bony bumps. The edge should be either behind or in front of the bump. |
 |
|
| Avoid an edge that curves in (better to heat it and bend it out a little). |
Deciding how wide or narrow to make the sides of the brace at different points will depend on the needs of the particular child.
 A child whose ankle or foot does not have a typical shape, or is floppy, or who needs a stiff ankle brace to help push back a weak knee (see different needs) may need a brace with wide sides at the ankle and foot. |
 A child who needs only the ankle stabilized may walk better with a brace that lets the front of the foot bend up and down a little. |
 Many children benefit by a brace that allows some up and down ankle movement but prevents sideways movement. This can be done by cutting back the sides of the brace here.
This will be the weak point in the brace. So, the plastic must be extra thick here. |
 Or you can strengthen it by putting extra strips of hot plastic on the back of the plaster mold before stretching the whole plastic over it. |
Different plastic brace models for different needs
In various places in this book we have shown different brace models and how they meet the particular needs of a child. See, for example, "Evaluating a Child’s Needs for Aids and Procedures" and "Braces for use after correcting club feet". Here are a few more ideas for different plastic braces:
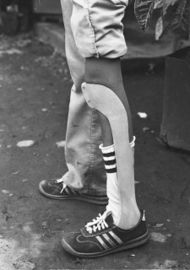
Below-knee brace that gives knee support
 The child with a weak upper leg whose knee cannot support her full weight, may be helped enough by a brace that pushes her knee back.
A strong stiff ankle on the brace, with the foot tilted down slightly (more than 90°), pushes the knee back when she steps. |
 Front of brace presses against knee.
The simplest way to make this brace is to rivet the seam where the plastic joins in front. (See photo.) |
|
CAUTION! The shoe or sandal may affect the angle of the foot. Allow for this when deciding the angle for the foot of the brace. |
 |
| A similar brace can be made in 2 parts. | |
| 1. Make the lower part, and place it back on the plaster mold. | |
 |
2. Place the mold like this and form the top part of the brace over the lower part. |
| When the child grows, this brace can be made longer by removing the rivets and separating the 2 ends more. |  rivets |
Side-support knee brace
A brace that supports the knee may help a child that has a sideway bend or partial dislocation of the knee.
 |
Make the brace higher on the side that needs more support. |  |
Also, make the brace higher on the side of the ankle that needs more support. |  |
Also, in an above-knee brace, you can put extra support on the side of the knee that needs it. |

Above-knee plastic braces
The simplest kind of above-knee plastic brace is a single piece without a knee hinge. You can make it in the same way as a below-knee brace, with or without a footpiece. These braces are useful on small children.
To make a jointed above-knee brace:
| 1. Draw the shape of the child’s leg on paper. | 2. Mark the height of the |
 |
 hip bone
crotch
mid-knee
ankle bone |
| 3. After forming the plastic pieces on plaster molds, bend metal joint pieces so they fit the shape of the leg. | 4. Temporarily pin or bolt the plastic pieces to the metal pieces. Then you can adjust the front-to-back angles with the brace on the child. |
|
To bend the flat bar, make or buy a bending iron.
 |
 |
| 5. When the angles are right, mark the position, and after checking all aspects of fit, rivet the pieces together and add straps and knee supports. | Hinged braces can also be made using the plastic itself for knee hinges, and even ankle hinges. However, these hinges may not last long with heavy use. |
 |
 knee hinge
ankle hinge
rivet |