

Hesperian Health Guides
Plaster and Bamboo Below-Knee Artificial Leg
HealthWiki > Disabled Village Children > Chapter 67: Artificial Legs > Plaster and Bamboo Below-Knee Artificial Leg
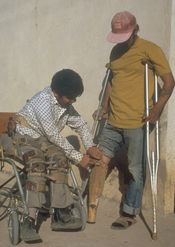 |
| A village rehabilitation worker fits a young man with a bamboo limb. (PROJIMO) |
This simple, low-cost leg was developed for refugee amputees in Thailand by Operation Handicap Internationale. It is most useful as a temporary limb for learning to walk. However, if the inner (plaster) part of the socket is made with waterproof glue, or is protected from getting wet, the leg can last for a long time.
Contents
Steps for making the plaster socket
| 1. Make a thick “cup” or “cap” of sponge or folded cloth and tape it over the end of the stump (to give it a little extra length). |  |
|
| 2. Put a thick, tight-fitting stocking—without seams if possible—over the stump and knee. (Several thin layers of stocking can be used instead of a thick one.) | Pull tight to avoid wrinkles. |
 |
| Putting holes near the top of the stocking makes it easy for the child to pull it up tight against the skin while the cast is put on. |  |
|
| 3. Put a thin plastic bag over the stocking. |  |
|
| 4. Put a thin cotton stocking or stockinette over the plastic bag and also pull tight to avoid wrinkles. |  |
|
| 5. With the stocking stretched tight, mark the important places with a grease pencil. The pencil marks will print onto the inside of the plaster cast when it is removed. | ||
Note: If you do not have a stocking, you can mold the socket directly on the stump. Shave any hair off the stump and cover it with vegetable oil (for example, coconut or palm oil). | ||
Mark all these places:

VIEW
VIEW
| 6. Wrap the stump and knee with plaster bandage. Be very careful to put the bandage on evenly and smoothly. (Elastic plaster bandage works best, but is very costly. To reduce costs you can make your own plaster bandages for casting.) | |
| Cast the knee with the stump slightly bent. |
 Keep the knee at about this angle. |
MAKING THE PLASTER WATER-RESISTANT
The plaster cast of the stump will become the inner layer of the socket of the bamboo limb. So it should be strong and waterproof. To make the cast stronger and water-resistant, wet the plaster bandage with glue instead of water.

Note: If the plaster cast is to be used only as a mold for making a leather or resin socket, use water, not glue.
</center>
| 7. As the plaster dries, hold the stump firmly below the knee. |
 Press your thumbs on each side of the tendon just below the kneecap.
FRONT VIEW
BACK VIEW
With the ball of the hand, press gently on the muscles on both sides of the leg.
With the 2 middle fingers of each hand, press into the hollow behind the knee.
Hold the stump like this until the plaster is hard enough to hold its shape.
|
| 8. When the cast becomes hard, mark where to cut the top edge (see below). | |
| SIDE VIEW | BACK VIEW |
 | |
| 9. To remove the cast, roll the stocking over it. Put your hands over the pressure points (as shown above). Have the child wiggle the stump as you gently pull off the cast. | |
 It may be necessary to cut the cast behind the knee, like this, to get it off. | |
| 10. Cut the cast along the line you drew. | |
 1 cm
3 to 4 cm |
The dip behind the knee should reach at most ½ cm above a line passing through the mid-point of the kneecap tendon. |
Preparing the bamboo post
| 1. Select a piece of strong, green bamboo a little longer than the good leg from the knee to heel. |
 bamboo 4 cm to 6 cm thick
The joint in the bamboo should be about 2 cm below the end of the stump. |
| 2. Split the bamboo to a little below the level of the stump end. Split into thin strips— each about ¾ cm wide. |
 Hold the post up firmly in a vise or a log with a hole in it — or however you can. |
| 3. Remove the softer inner layer from each of the thin strips. |  |
| 4. Spread the bamboo strips around the plaster socket. |  |
| 5. Position the socket as correctly as you can. Then, with a thin wire, wrap the bamboo tightly against the socket. |  |
| 6. Put the limb on the stump and have the child stand on it. Check the length. If necessary, cut some off the post. |
 Cover stump with cotton stocking.
Make sure the post is straight or at the same angle as the other leg. If not, loosen the wire and re-adjust until you get it right. |
Note: If child uses a shoe or sandal, be sure to have her wear it when measuring the height of the limb. |
| 7. After trimming the tops of the bamboo strips, cover the outside of the socket with several layers of glue, sawdust, and gauze bandage: | |
|
 glue
sawdust |
| 8. Smooth the outside of the socket with sandpaper. Also smooth and round the inner edges at the top. |
 CROSS SECTION |
| 9. Make a cuff to hold the limb on. (If attached correctly, it should also help keep the knee from over-straightening.) | |
 Fit cuff just above kneecap.
Rivet cuff to socket slightly behind mid-line (Mark rivet points with tabs pulled tight when knee is a little bent.) |
|
| 10. Make a rubber heel—a piece of thick truck tire works well. If you can, cut the tire so that a plug fits inside the bamboo. Cut off bamboo as much as the heel is thick. (Be sure to allow for height of sandal or shoe on other foot.) | |
Design for the knee cuff
Use strong leather and line it on inside with soft smooth leather. It should be a few cm longer than the distance around the knee.

Glue layers of leather and webbing together with rubber cement and sew at edges.
| 11. Have the child stand and walk on the limb for several minutes. Then remove it and look for sore spots on the child’s skin, or signs of too much pressure. Check especially over bony spots. An area that looks pale when the limb is removed and then turns red or dark, is a sign of too much pressure. |
 bony spurs | |
| 12. Scrape shallow pits into the socket from the inside, at the points where it presses over bones. You may also need to build up around the area where pressure occurs. |
 rasp (file) |
(To help you find the right points, it helps to have marked ‘bony spots’ before casting. They will then be ‘printed’ inside the socket — see "Mark all these places" above.) |
 the top edge,
behind the knee,
SIDE VIEW CROSS SECTION |
 under the kneecap,
under the inner side of the knee,
and on each side of the shin bone.
'
BACK VIEW CROSS SECTION
If socket presses on the end of the bone, scrape out a hollow here. |
During the first few weeks of using an artificial limb, the stump becomes smaller, and several changes in limb size may be needed. To save time, use a shorter bamboo post so that the plaster socket can be replaced several times with new, smaller ones.
| Put the glue and sawdust only up to here. |  |
Hold the bamboo strips to the cast with wire. Cut the wire to change the plaster socket. |
Artificial leg using PVC plastic pipe instead of bamboo
Where plastic PVC water pipe is available, it can be used instead of bamboo. Use a
3 cm (1¼ inch) thick-walled PVC.
| 1. Measure the tube the same as bamboo, and cut it to form 4 strips. | 2. Heat the PVC in an oven until it gets a little soft. | 3. Fit the hot PCV around the socket piece and wrap it tightly with a long strip of cloth or rubber until it cools. |
 |  |  |
| 4. Fasten PVC firmly to socket with wire or rivets (or both). It is best to attach it temporarily with wire and to have the child try it before you fix it permanently. | 5. Cover with sawdust and glue, or with resinbase casting bandage (very expensive) or with fiberglass and resin (also expensive). |
Note: For a stronger, water-resistant limb, the socket can also be made with resin-based casting bandage. But this is also expensive.
Adjusting the PVC leg
| After the child tries on the leg, if the angle seems wrong, you can gently heat the PVC near the stump |

and bend it to the desired position. |
Lengthening the PVC leg to allow for growth of the child
| 1. Cut through PVC pipe. |  |
2. Cut a strong hardwood rod or plastic tube that just fits inside the PVC. |  |
| 3. Cut a ring of PVC pipe as long as the additional leg length needed. (Make it a little extra long to allow for more growth.) |  |
5. Drill holes and screw or bolt leg together tightly. |
| 4. Put the wood rod inside the PVC with the new ring of PVC. |
| 6. When an even longer limb is needed, replace the short ring with a longer one. | 7. If necessary, to make the joint stronger, cut a piece of PVC lengthwise, heat it, put it over the leg tube, and attach it tightly. |  |